CRUD Operations using SPFx React Webpart & Rest API (SPHttpClient)
We will be covering below topics in this post.
- Office UI Fabric React(Fluent UI) Intro
- Create new SPFx React webpart
- Setup basic code structure
- Setup SP Workbench(To test webpart):
- Deploy sppkg to App catalog
- Step 1: Read Operation: (Show all SharePoint list names to dropdown):
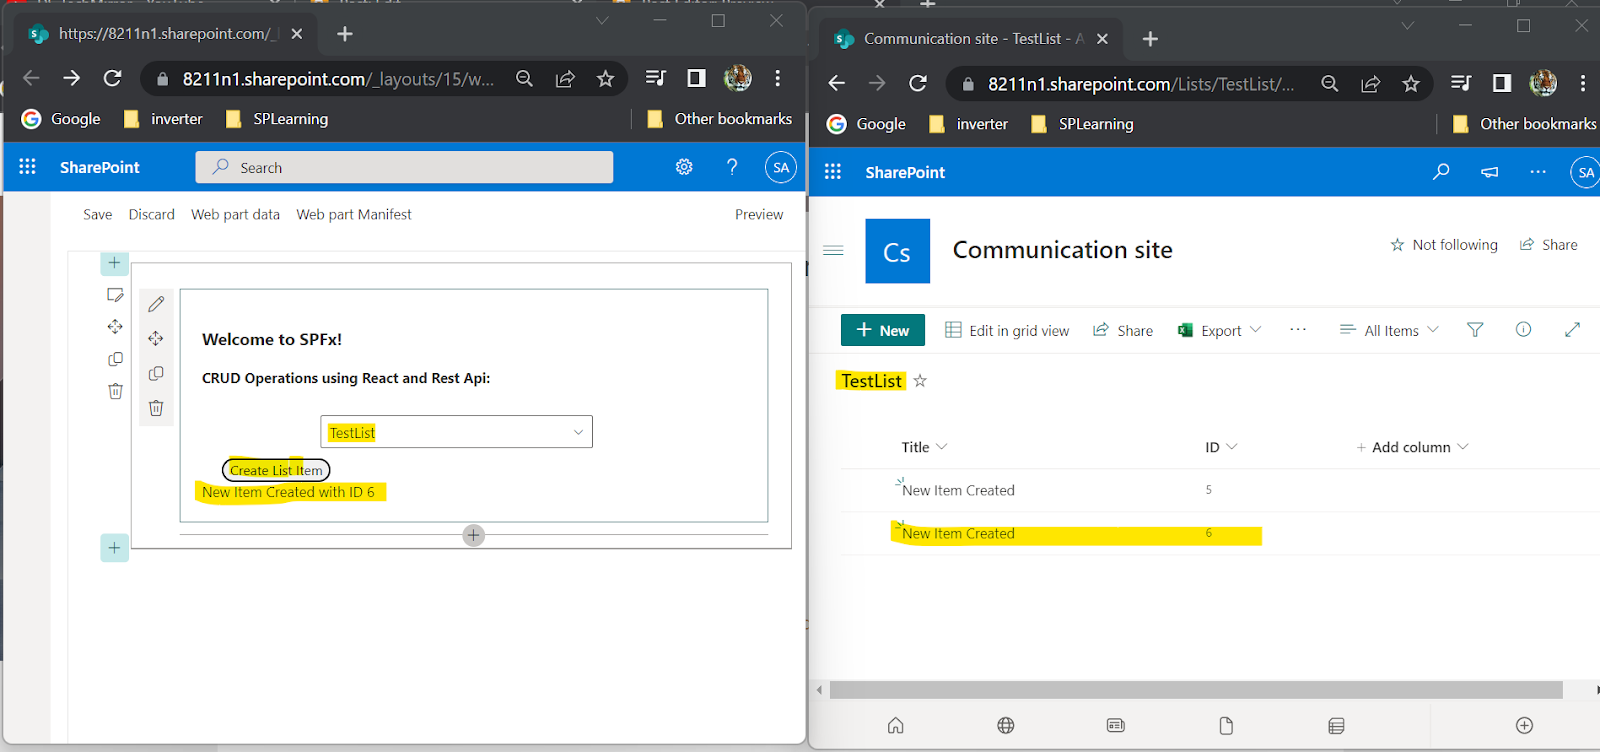
- Step 2: Create Operation: (Create new item to SharePoint list using button click):
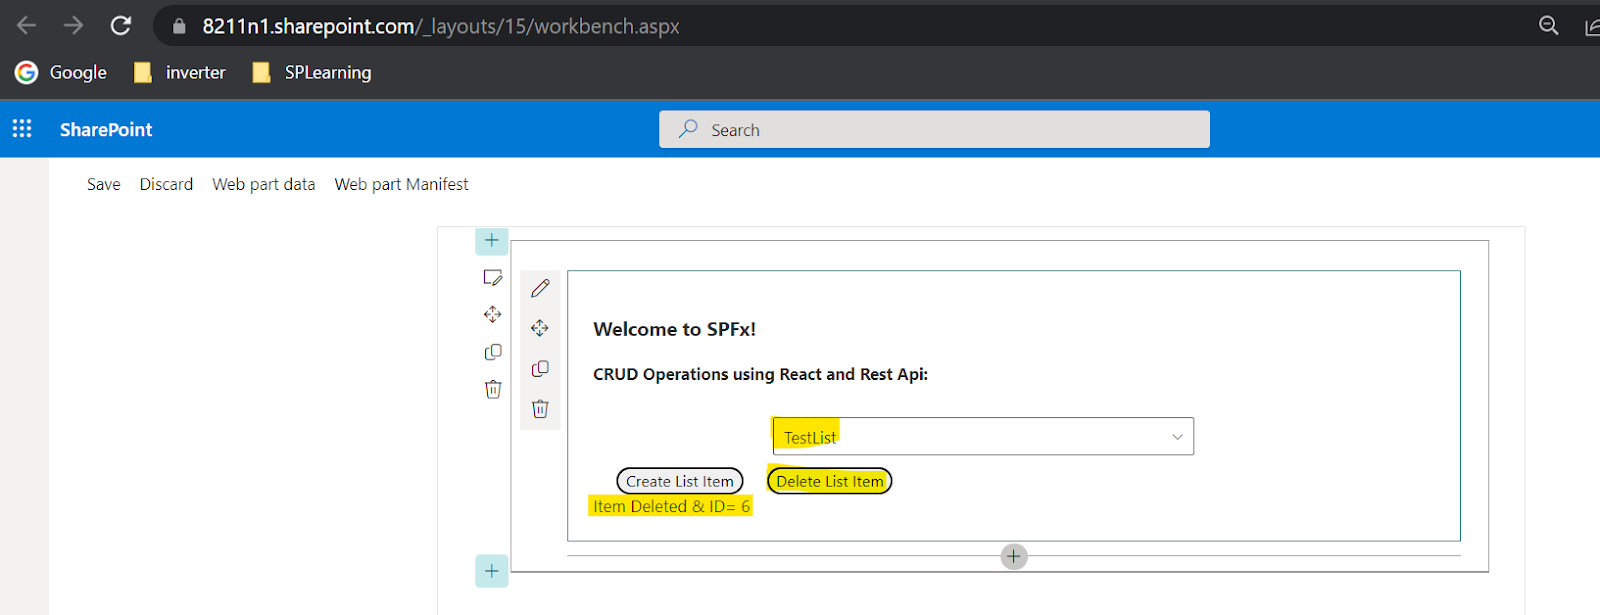
- Step 3: Delete Operation: (Delete list item by button click):
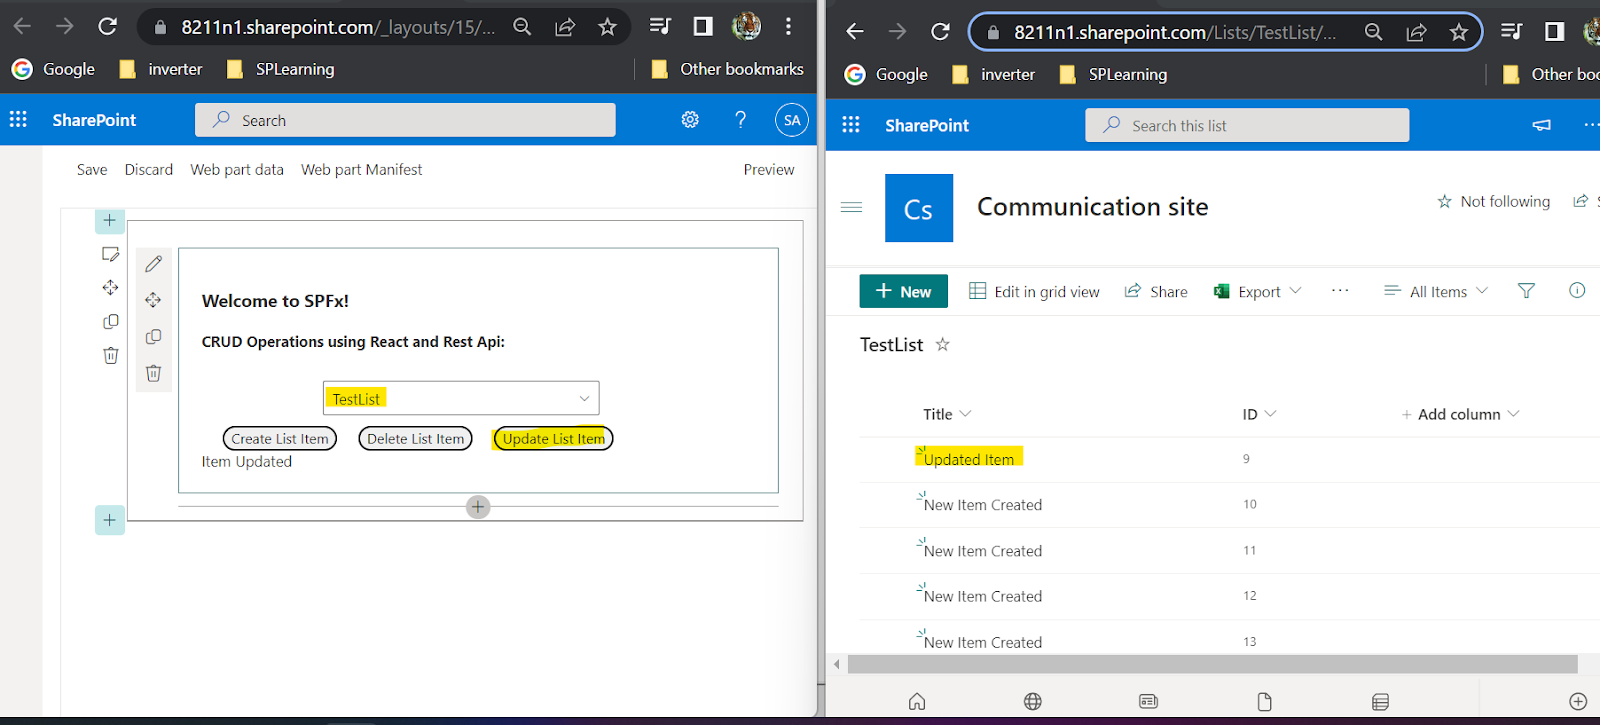
- Step 4: Update Operation: (Update list item by button click):
- Code for CRUD Operations:
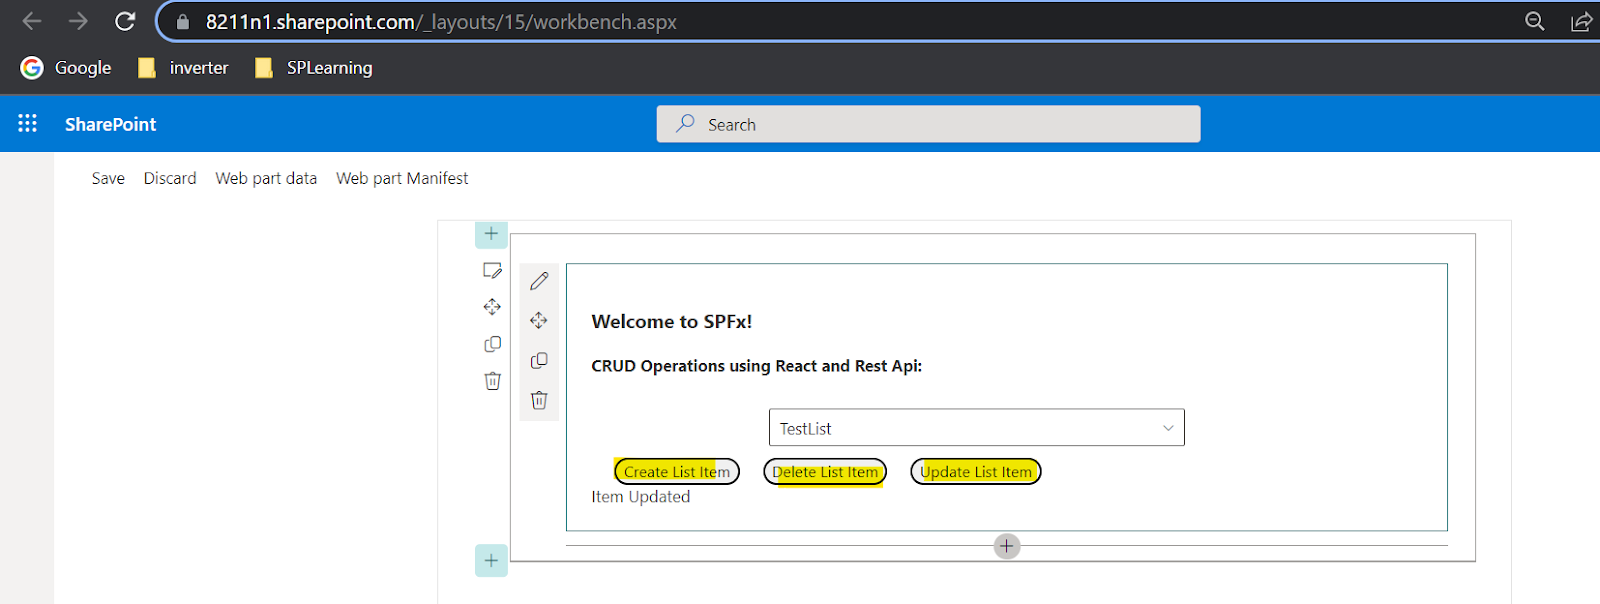
Final Output:
We will be using "Office UI Fabric React" as a front end which is a official front end framework for office 365.
If you are first time working SPFx React webpart then please go through this SPFx React Basic concepts
Office UI Fabric React Intro:
- Its a official front end framework for office 365
- It provides various controls like buttons, labels, dropdowns, document card, etc
- Installation comment:
- npm install office-ui-fabric-react
- UI Fabric became Fluent UI now
- Npm I @fluentui/react
Create new SPFx React webpart
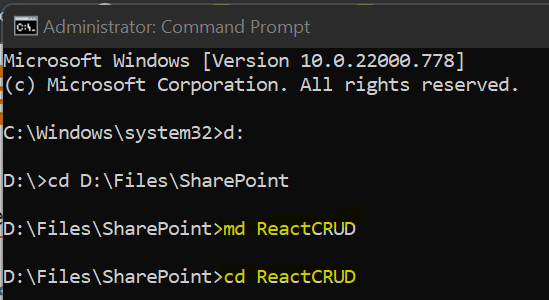
Create new folder(ReactCRUD) for solution manually or using cmd prompt.
Create Folder: md ReactCRUD Open Folder: cd ReactCRUD


(ii)Create State(Used like Properties):
 Add constructor for State in Component (.tsx) file


To apply styles use "src\webpart\component\module.scss" && add CssClass to controls
1.State.ts: Create state obj "status" to show newly created List item ID ("src\webpart\component\State.ts")


Addtional function (Get Latest Item ID from list to delete):
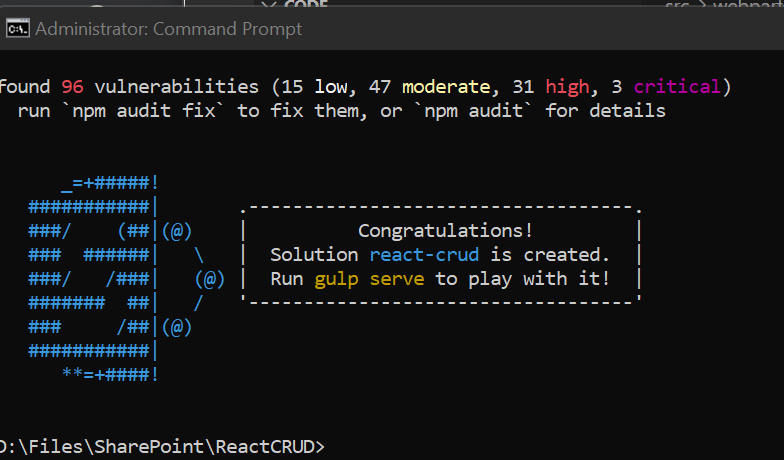
Type the below yeoman comment to create spfx component using yeoman.
yo @microsoft/sharepoint
yo @microsoft/sharepoint
Provide the details for solution name, webpart name, etc... & Select template as React.
Open solution in Visual Studio Code
Now we have to open the folder using visual studio code.(or Enter "code ." in cmd prompt it automatically opens this solution in VS Code)
Setup basic code structure:
(i)Using Webpart Context in Props.ts file:
Webpart context only available in webpart.ts file. To use WP context in component we have to
- Add WPContext in "src\webparts\component\Props.ts" file.
context:WebPartContext;
- Passing WP Context from "src\webparts\webpart.ts" file(to component files)
(ii)Create State(Used like Properties):
State object can be used as a dynamic properties(since 'Props' are read only).
Create State.ts:
Components folder > Copy past the Props file and rename Props to State (Or right click>New file>add ts file). Rename Interface from Props to State.(Add properties as per requirement )
(iii)Create Service Files(For Crud Functions):
We will create service.ts file & Split the code for better understanding.
- Right click on 'webparts' folder > create new folder 'Services' > right click on Services folder > create SPServices.ts file
- Add export class in this file. (it will be used in components .tsx file)
- In component .tsx file Import this service file & create object Class
import {SPOperations} from '../../Services/SPServices'
public _spOps:SPOperations;
Setup SP Workbench(To test webpart):
To test in SP Workbench, update sharepoint site url in "Config\Serve.json" file & run "gulp serve" command
Add the initial webpart in SP Workbench & validate.


Deploy sppkg to App cataglog:
To get sppkg file run below command
gulp build --ship
gulp bundle --ship
gulp package-solution --ship
After this commands solution will create sharepoint folder & sppkg file. Next we can upload this sppkg file to app catalog site library & Enable it. Now we can edit the page & add his webpart.
Step 1: Read Operation: (Show all SharePoint list names to dropdown):
Output Screen: Get all Share Point list name into dropdown. (Code added below)
1.State.ts: Create state obj "listTitles" to get List values ("src\webpart\component\State.ts")
listTitles:IDropdownOption[]
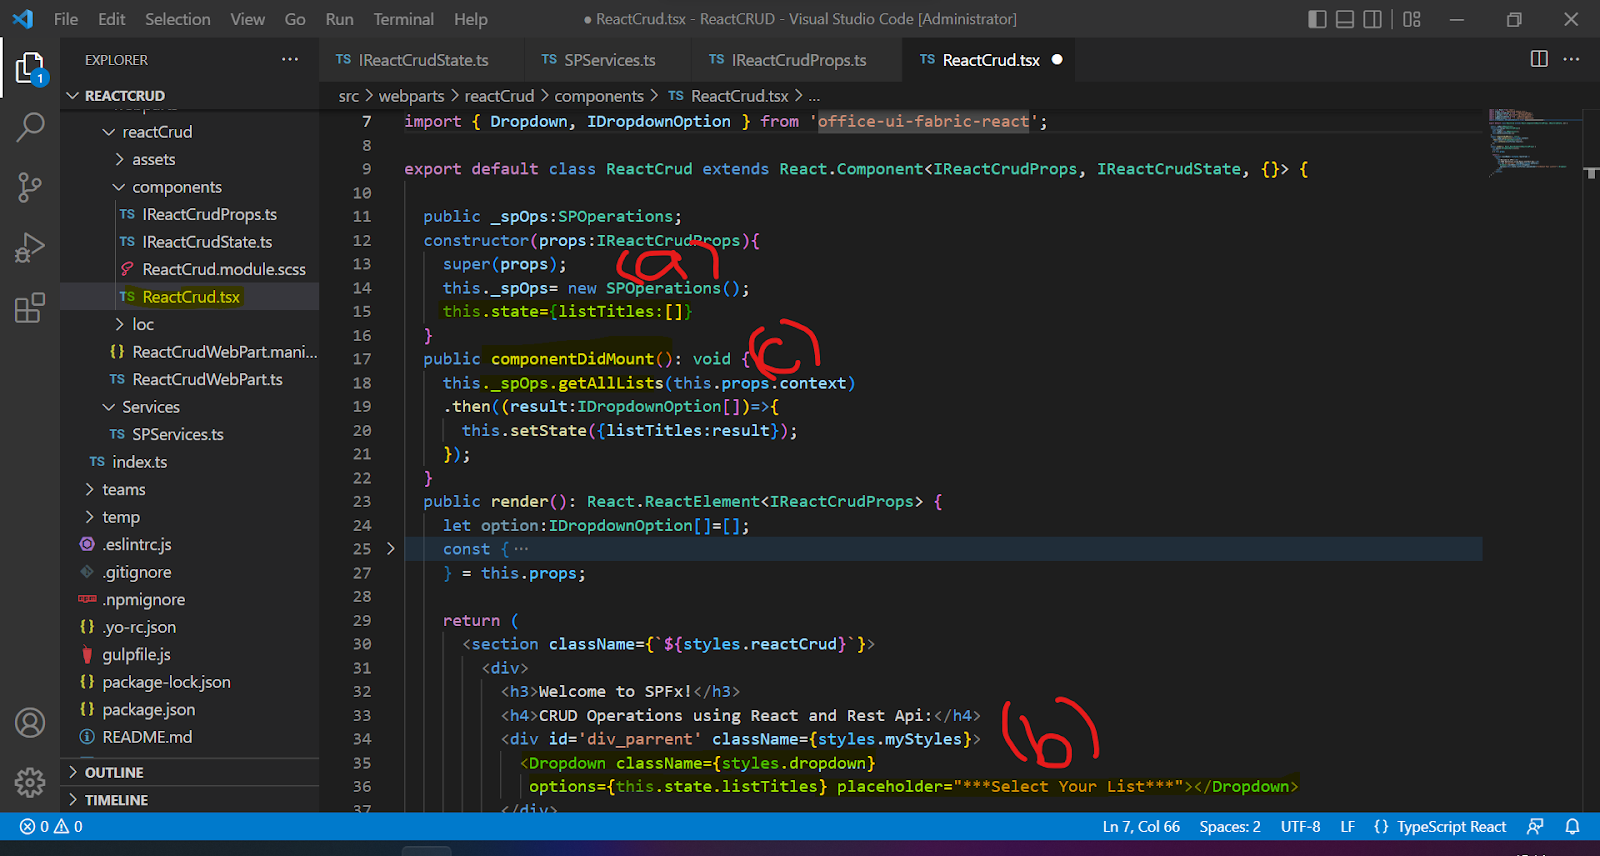
2.Component File: Initialize "listTitles" ("src\webpart\component\.tsx")
(a) Initialize this under constructor > this.state={listTitles:[]}
(b) Add dropdown control & assign this value to ddl option options={this.state.listTitles}
(c) Add componentDidMount() method after the constructer. From here we will call the Service method which will return SP Data. This method is called after React render method called. Refer this for React Life cycle.
3. Service.ts : Add Method getAllLists to get data from SharePoint.
Pass the webpart context as a parameter. Add
import {SPHttpClient, SPHttpClientResponse} from "@microsoft/sp-http" Note: Code available at the end of this post
Step 2: Create Operation: (Create new item to SharePoint list using button click):
Output: Select List name in dropdown to create new item
1.State.ts: Create state obj "status" to show newly created List item ID ("src\webpart\component\State.ts")
2.Component File: Initialize "status" ("src\webpart\component\.tsx")
(a) Initialize status under constructor > this.state={status:""}
(b) Add button control & bind click event to create new list item.
(c) Add div & display status (Shows newly created list item ID)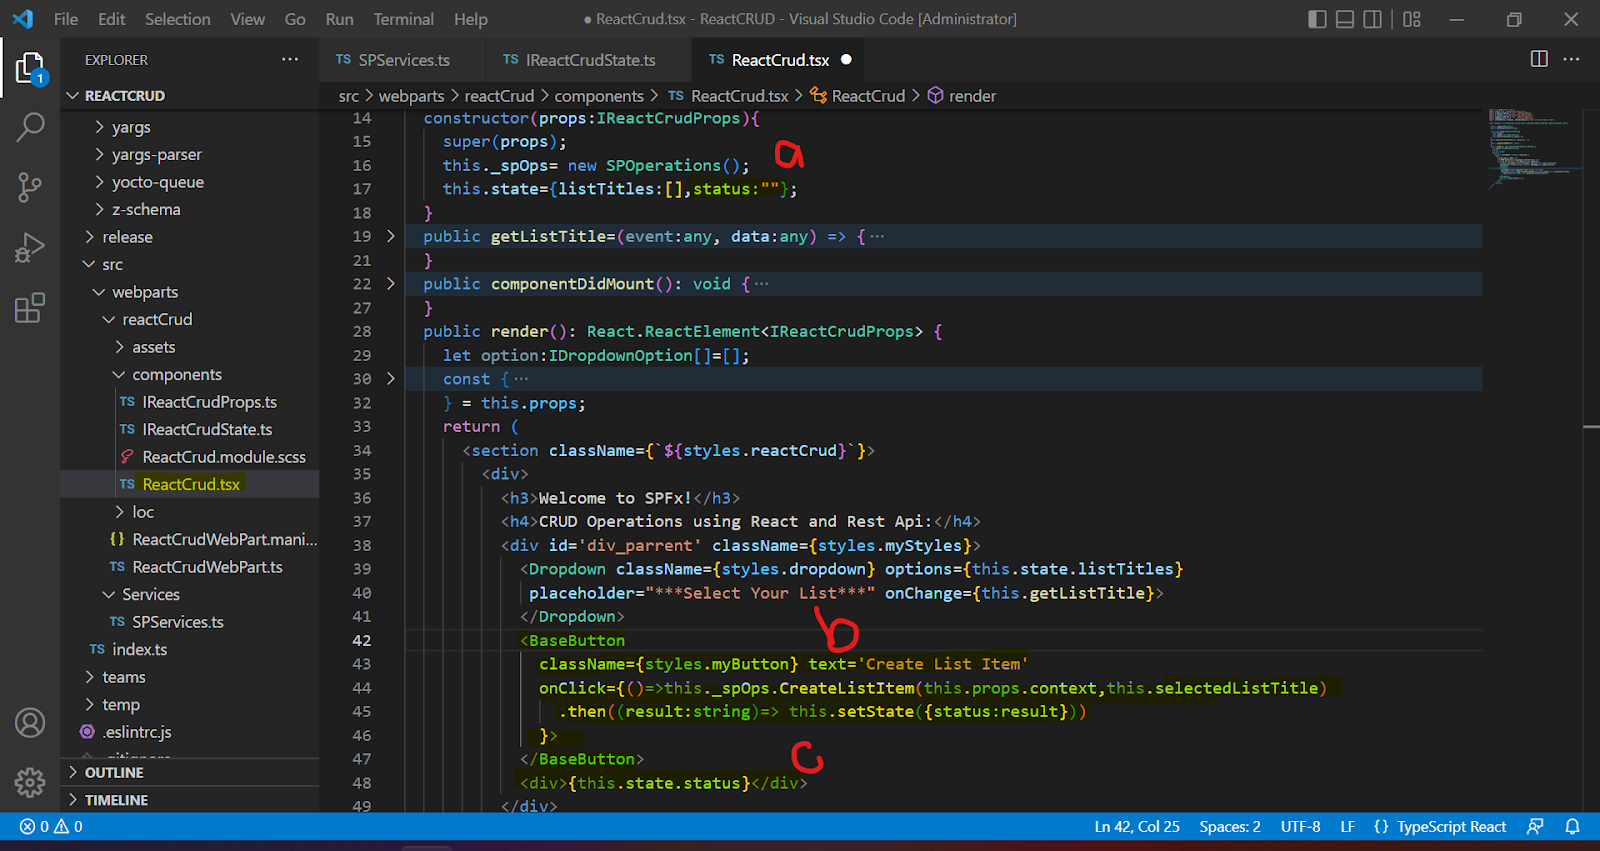 To apply styles use "src\webpart\component\module.scss" && add CssClass to controls
<BaseButton
className={styles.myButton} text='Create List Item'
onClick={()=>this._spOps.CreateListItem(this.props.context,this.selectedListTitle)
.then((result:string)=> this.setState({status:result})) }>
</BaseButton>
<div>{this.state.status}</div>
3. Service.ts : Add Method getAllLists to get data from SharePoint.
Pass the webpart context & List Title as a parameter. Add this header
import {SPHttpClient, SPHttpClientResponse, ISPHttpClientOptions} from "@microsoft/sp-http"Note: Code available at the end of this post
Step 3: Delete Operation: (Delete list item by button click):
Output: Select List name from dropdown & Latest item will get deleted from this list.
1.State.ts: We will reuse state obj "status" to show deleted List item ID ("src\webpart\component\State.ts")

2.Component File: ("src\webpart\component\.tsx")
Add button control & bind click event to delete list item.
Div to Display status (Shows deleted list item ID)
To apply styles use "src\webpart\component\module.scss" && add CssClass to controls

3. Service.ts : Add Method deleteListItem (Here we will get latest item from list and delete)
<BaseButton
className={styles.myButton} text='Delete List Item'
onClick={()=>this._spOps.deleteListItem(this.props.context,this.selectedListTitle)
.then((result:string)=> this.setState({status:result})) }>
</BaseButton>
<div>{this.state.status}</div>
Pass the webpart context & List Title as a parameter. Add this import(if not present already)
import {SPHttpClient, SPHttpClientResponse, ISPHttpClientOptions} from "@microsoft/sp-http" Delete function
Get latest ID from list to delete function 
Note: Code available at the end of this post
Step 4: Update Operation: (Update list item by button click):
Output: Select List name from dropdown & Latest item will get deleted from this list.
1.Component File: ("src\webpart\component\.tsx")
Add button control & bind click event to update list item
Div to Display status (Shows deleted list item ID)
To apply styles use "src\webpart\component\module.scss" && add CssClass to controls
<BaseButton
className={styles.myButton} text='Update List Item'
onClick={()=>this._spOps.updateListItem(this.props.context,this.selectedListTitle)
.then((result:string)=> this.setState({status:result})) }>
</BaseButton>
<div>{this.state.status}</div>
2. Service.ts : Add Method updateListItem (Here we will pass ListItemID and delete)
Pass the webpart context & List Title as a parameter. Add this import(if not present already)
import {SPHttpClient, SPHttpClientResponse, ISPHttpClientOptions} from "@microsoft/sp-http"Note: Code available at the end of this post
Code for CURD Operations:
READ (Get all sharepoint list names to dropdown):
public getAllLists(context:WebPartContext):Promise<IDropdownOption[]>
{
let restApiURL:string = context.pageContext.site.absoluteUrl + "/_api/web/lists?select=title";
var listTitles:IDropdownOption[] = [];
return new Promise<IDropdownOption[]>(async(resolve,reject)=>{
context.spHttpClient
.get(restApiURL,SPHttpClient.configurations.v1)
.then((response:SPHttpClientResponse) => {
response.json().then((result:any) => {
console.log(result);
result.value.map((result:any)=>{
listTitles.push({
key:result.Title,
text:result.Title
});
});
});
resolve(listTitles);
},
(error:any):void=>{reject("error occured: "+error)});
});
}
CREATE:
public CreateListItem(context:WebPartContext,listTitle:string):Promise<string> {
let restApiUrl:string =
context.pageContext.site.absoluteUrl+"/_api/web/lists/getbytitle('"+listTitle+"')/items";
const body:string=JSON.stringify({Title:"New Item Created"});
const options:ISPHttpClientOptions= {
headers:{Accept:"application/json;odata=nometadata",
"content-type":"application/json;odata=nometadata",
"odata-version":"",},
body:body
}
return new Promise<string>(async(resolve,reject)=>{
context.spHttpClient.post(restApiUrl,SPHttpClient.configurations.v1,options)
.then((response:SPHttpClientResponse)=>{
response.json().then(
(result:any)=>{
resolve("New Item Created with ID "+ result.ID);
},
(error:any)=>{
reject("Error Occured: "+error);
}
)
});
});
}
UPDATE
public updateListItem(context:WebPartContext, listTitle:string):Promise<string> {
let restApiUrl:string =
context.pageContext.site.absoluteUrl+"/_api/web/lists/getbytitle('"+listTitle+"')/items(9)";
const body:string=JSON.stringify({Title:"Updated Item"});
const conHeaders:ISPHttpClientOptions= {
headers:{Accept:"application/json;odata=nometadata",
"content-type":"application/json;odata=nometadata",
"odata-version":"",
"IF-MATCH":"*",
"X-HTTP-METHOD":"MERGE",},
body:body,
}
return new Promise<string>(async(resolve,reject)=>{
context.spHttpClient.post(restApiUrl,SPHttpClient.configurations.v1,conHeaders)
.then(
(response:SPHttpClientResponse)=>{resolve("Item Updated")},
(error:any)=>{reject("Error Occured: "+error);}
);
});
}
DELETE
public deleteListItem(context:WebPartContext, listTitle:string):Promise<string> {
let restApiUrl:string =
context.pageContext.site.absoluteUrl+"/_api/web/lists/getbytitle('"+listTitle+"')/items";
const conHeaders:ISPHttpClientOptions= {
headers:{Accept:"application/json;odata=nometadata",
"content-type":"application/json;odata=nometadata",
"odata-version":"",
"IF-MATCH":"*",
"X-HTTP-METHOD":"DELETE",
},
}
return new Promise<string>(async(resolve,reject)=>{
this.getLatestItemID(context, listTitle).then((itemId:number)=>{
context.spHttpClient.post(restApiUrl+"("+itemId+")",SPHttpClient.configurations.v1,conHeaders)
.then(
(response:SPHttpClientResponse)=>{resolve("Item Deleted & ID= "+itemId)},
(error:any)=>{reject("Error Occured: "+error);}
);
})
});
}
public getLatestItemID(context:WebPartContext, listTitle:string):Promise<number> {
let restApiUrl:string =
context.pageContext.site.absoluteUrl+
"/_api/web/lists/getbytitle('"+listTitle+"')/items/?$orderby=Id desc&$top=1&$select=Id";
const conHeaders:ISPHttpClientOptions= {
headers:{Accept:"application/json;odata=nometadata",
"content-type":"application/json;odata=nometadata",
"odata-version":"",},
}
return new Promise<number>(async(resolve,reject)=>{
context.spHttpClient.get(restApiUrl,SPHttpClient.configurations.v1,conHeaders)
.then((response:SPHttpClientResponse)=>{response.json().then(
(result:any)=>{resolve(result.value[0].Id)},
(error:any)=>{reject("error occured "+ error)}
)})
});
}
Please refer this video for more details


Comments
Post a Comment