SPFx Run with elevated privileges
In this post we will create SharePoint list item using elevated access from SPFx webpart (by calling power automate post URL)
Steps Involved:
- Register our add-in in SPO with full control permission
- Create Power Automate: It will create SP List item with above registered add-in
- Call Power Automate from SPFx webpart
In this post we will learn about:
- /layouts/15/appregnew.aspx - Page to create Client Id & Client Secret
- /_layouts/15/appinv.aspx - Page to give permissions to Client Id & Client Secret
- App Permission Request xml - where we mention scope & permission level of app permission
- Get Access Token - Using client id & client secret from automate we will call http to get this
- Tenant ID - Site settings>Site collection app permissions(tenant id will be available after @)
- httpClient.post() - used to call power automate post URL from spfx (sphttpclient.post() -used in rest api calls)
- Access Token - we will get it from server by passing Client Id & Client Secret(Bearer token). By using this token we will execute with elevated access.
- Token type is not allowed Error - Grant App Permission is disabled by default. Link for more details (Run powershell script: set-spotenant -DisableCustomAppAuthentication $false)
Step1 - Register Add-in with full control:
Create Client Id & Client Secret:
- To register our SharePoint add-in "/layouts/15/appregnew.aspx"
- Generate Client id & Client Secret, Title, App Domain(Any Name), Redirect URL
- Click Create

- Go to "/_layouts/15/appinv.aspx"
- Enter App ID (which is Client Id) > Click Lookup > It will prepopulate
- Add App Permission Request xml (referred from here: Link)
- here we can give Scope :tenant/sitecollection/web/list/search/taxonomy/connection
- Rights : FullControl/Manage/Write/Read
<AppPermissionRequests AllowAppOnlyPolicy="true">
<AppPermissionRequest Scope="http://sharepoint/content/sitecollection/web/list"
Right="FullControl" />
</AppPermissionRequests>
<AppPermissionRequest Scope="http://sharepoint/content/sitecollection/web/list"
Right="FullControl" />
</AppPermissionRequests>
- Click Create > Select the List where we need full control to Add item (TestList) > Click 'Trust'
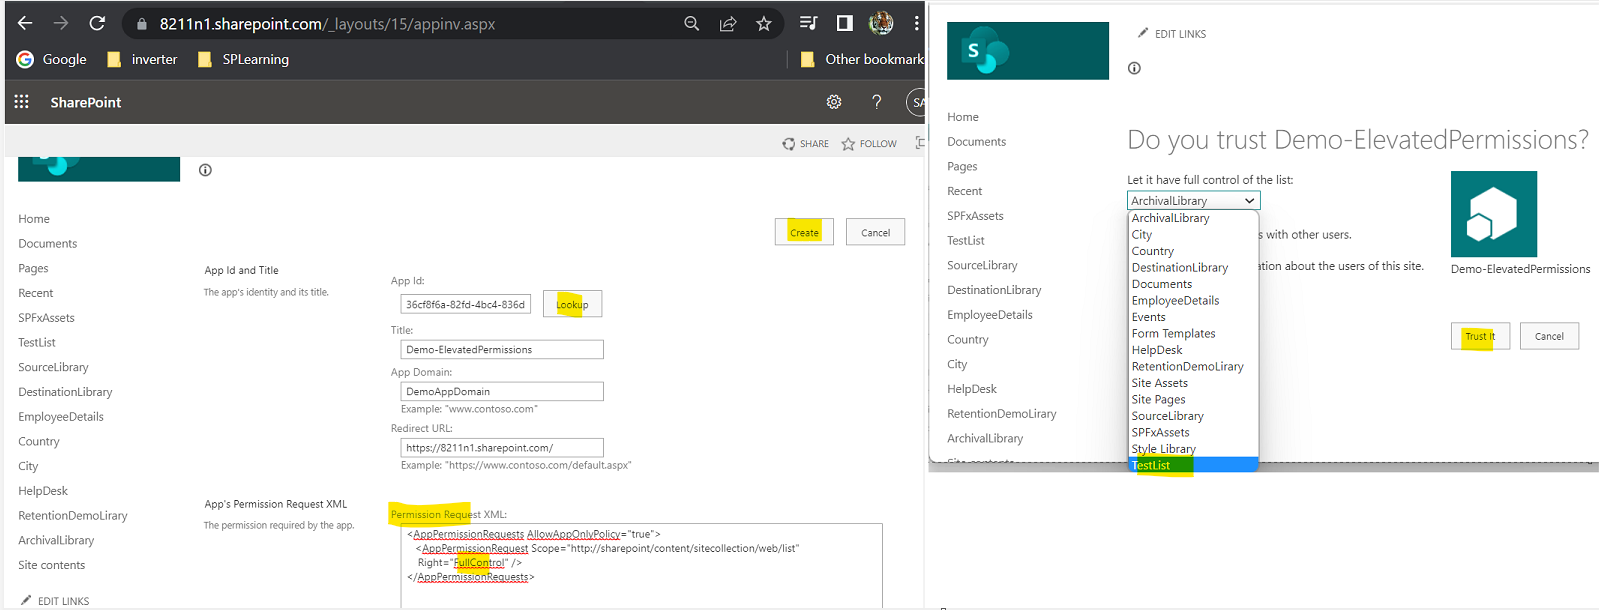
Tenant ID: To see out registered app details, Site Settings > Site Collection App Permissions > here we can see our registered app & Tenant ID(string after @)
 Get Access Token(Using HTTP): New Step > Search "Http" >
Method: Post
 Props.ts:
Step2 - Create Power Automate:
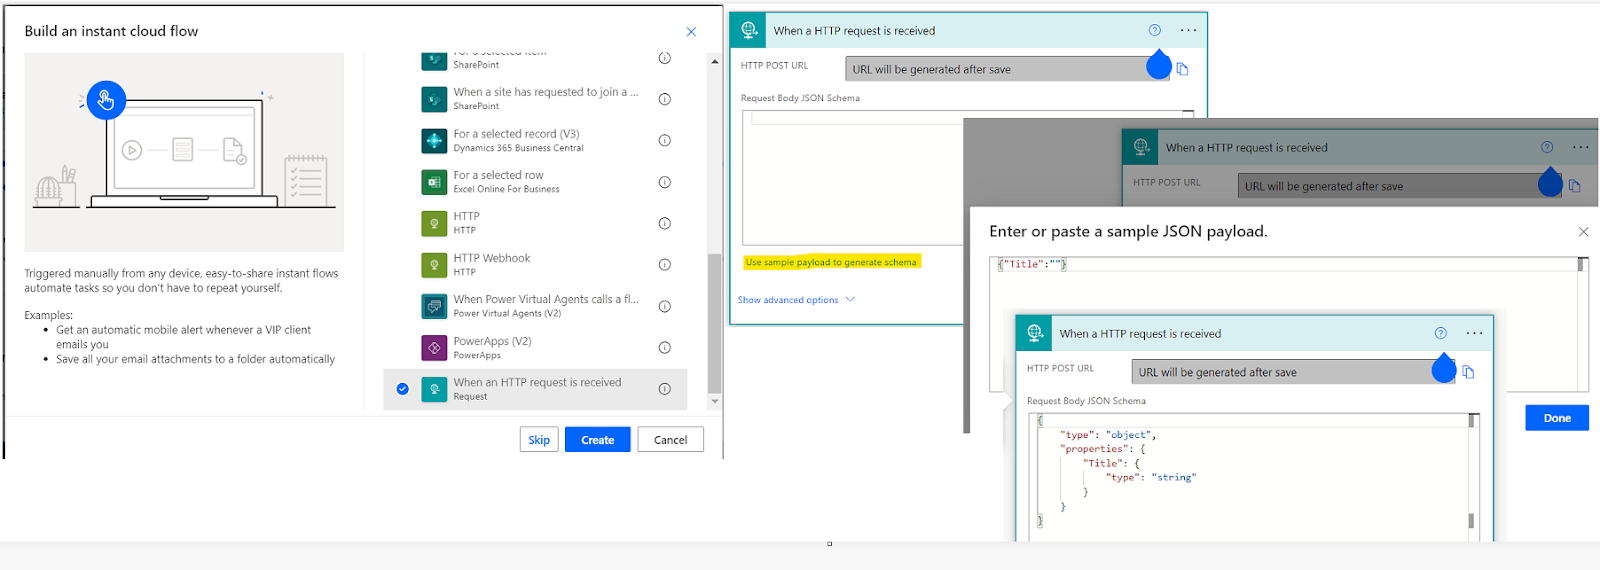
Create: Go to Make.powerautomate.com > Create > Instant Flow > 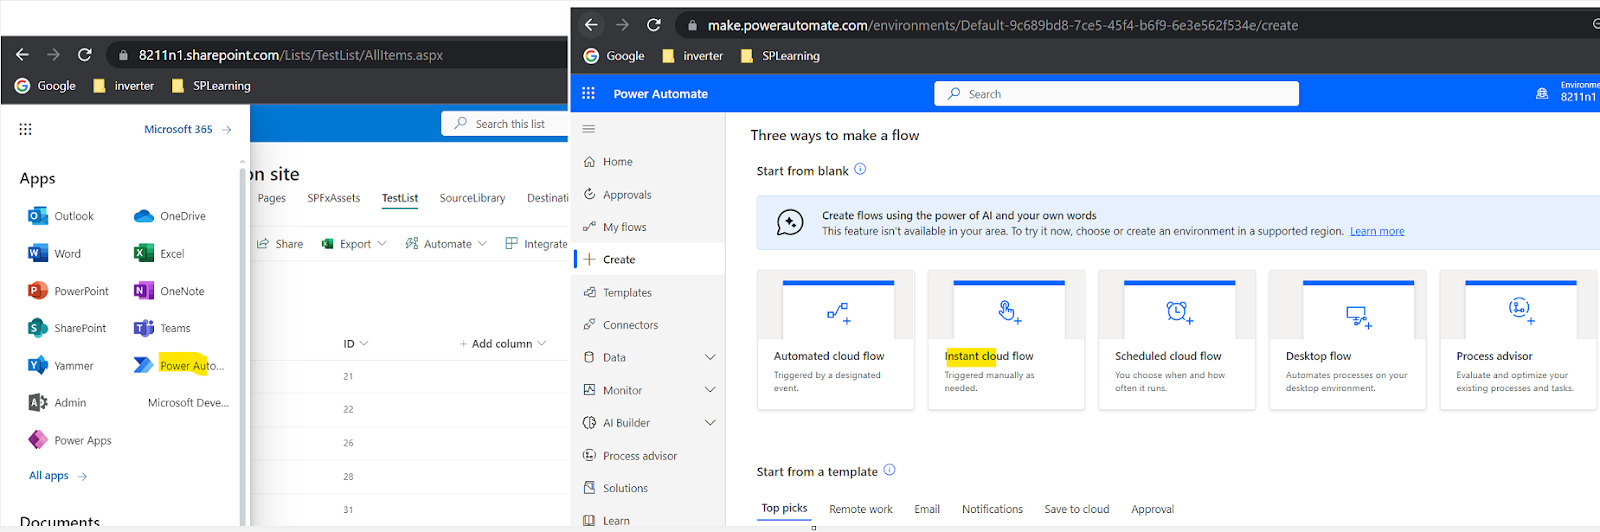 Select Trigger: "When http request received" > Create > Click Payload & enter {"Title":""} > Done
Method: Post
URI: https://accounts.accesscontrol.windows.net/<TenantID>/tokens/OAuth/2
Headers: content-Type application/x-www-form-urlencoded
Body:
Grant_type=client_credentials&client_id=<ClientId>@<TenantID>
&client_secret=<ClientSecret>
&resource=00000003-0000-0ff1-ce00-000000000000/<SiteURLWithoutHttp&/>@<TenantID>
Save > we will get Http Post URL & we can call this from SPFx webpart.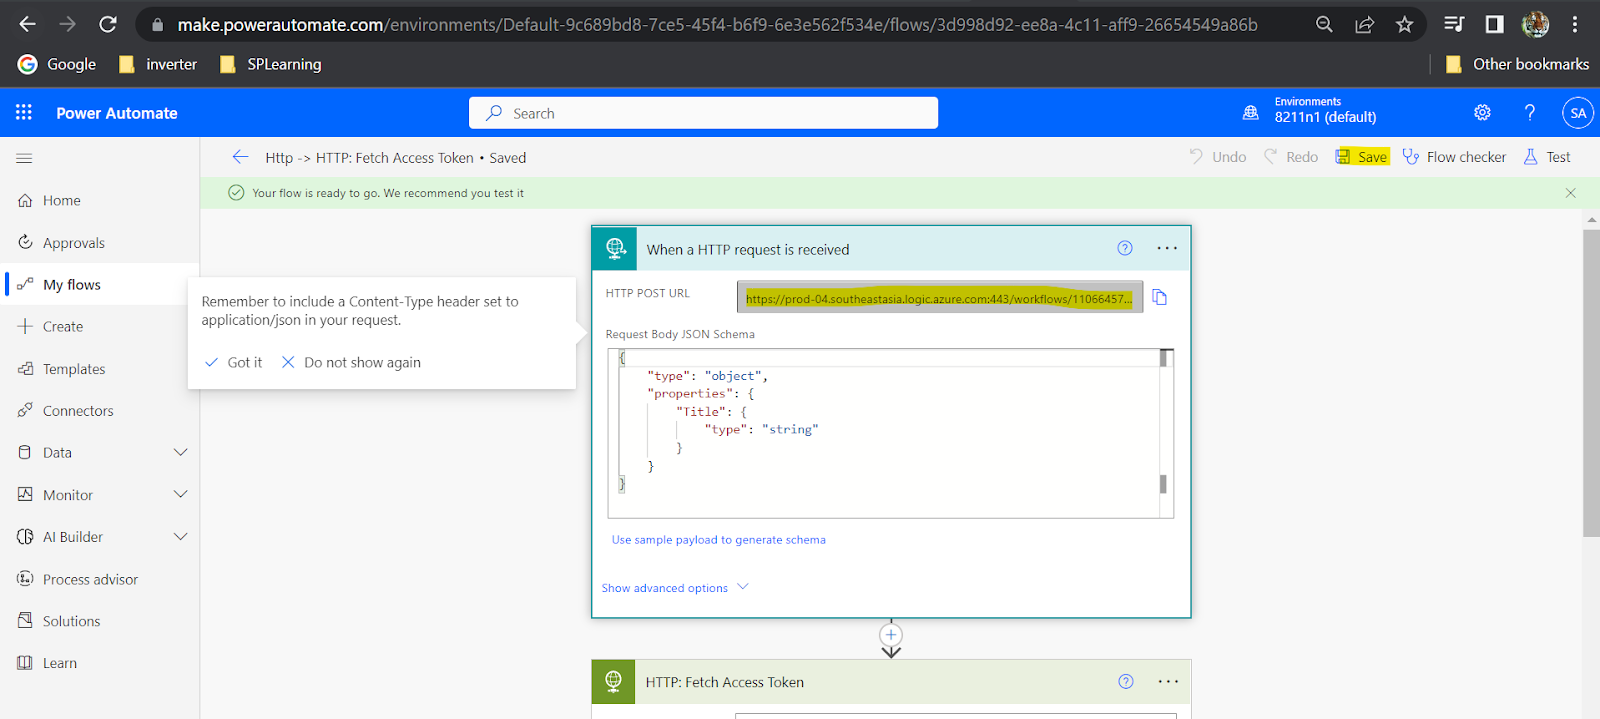
We will continue this Step 2 after creating SPFx webpart & using this post url there.
Step3 - Create SPFx Webpart & Call Power Automate:
Creating react SPFx webpart Complete details available here
We will be creating a new SPFx React webpart.
State.ts: In component folder Create state.ts & import this in component(.tsx) file
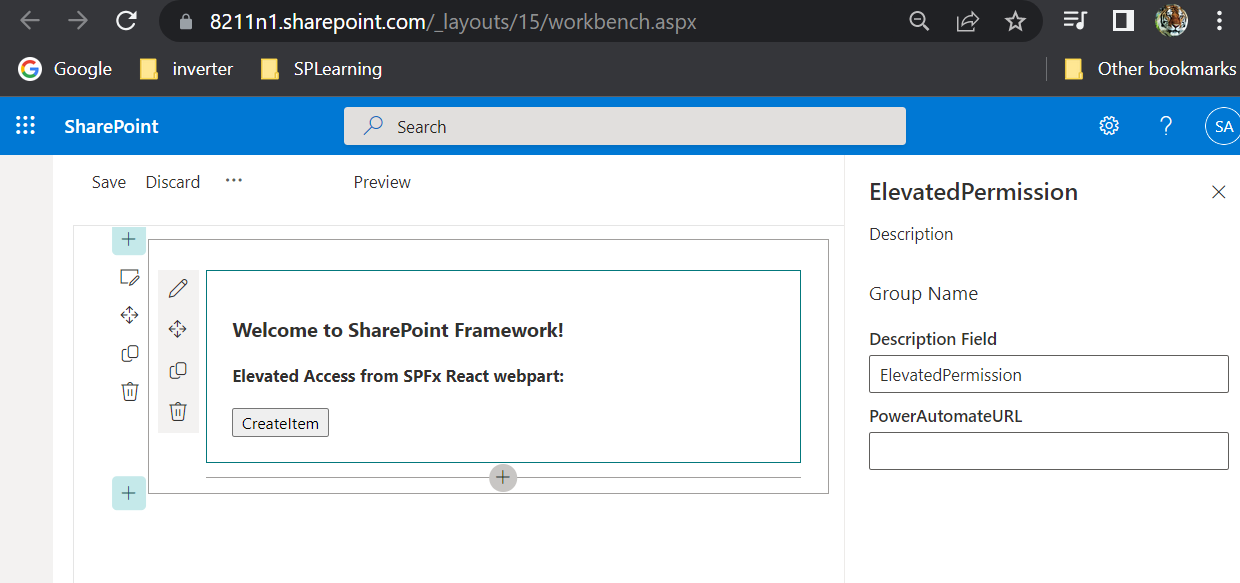
Add properties (context & flowUrl) & assign values from webpart.ts
flowUrl will be updated from webpart properties. Add new webpart property in webpart.ts > getPropertyPaneConfiguration() method. For Property label update loc files.


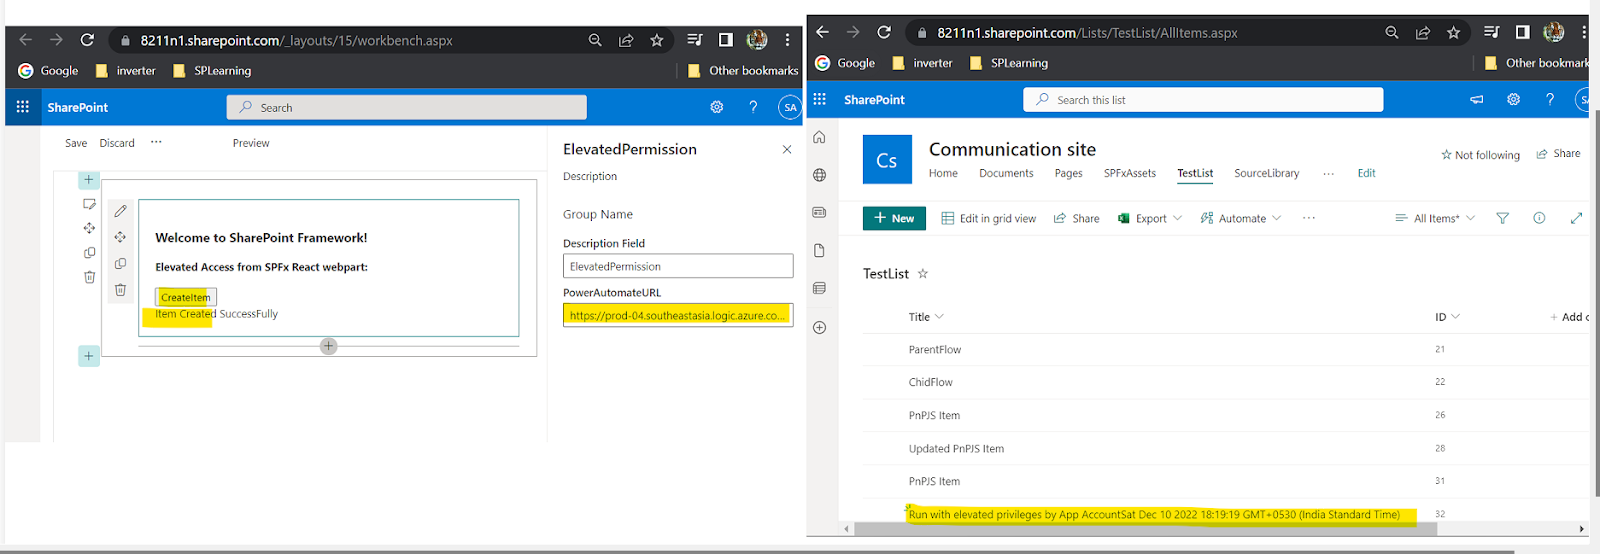
Add button(to create list item), Add div (show the success message)
Add import {HttpClient, HttpClientConfiguration, HttpClientResponse} from "@microsoft/sp-http"
Add Method callPowerAutomate() for button click
Initialize values in constructor & bind method in button onclick.
Note: Here we will use HttpClientResponse to create item from power automate.


Code Added end of this post.
Add the Power Automate Post URL in WP Property > Click Create Button (now it should trigger the Automate)

Step2 Continuation - Complete the Automate:
Check Run History: When we submit the button in SPFx > Power Automate Post URL will trigger the Flow. Now go to Make.powerautomate.com > My Flows > <Our Flow Name> > Run History > Click on Success item > Click on Http step
Get Access Token: Now we can see the access token here in Body. > Copy the Body Json (we will use in next step)
Edit Flow(Parse Json): > Click New Step > Parse Json > Content: Body(from Previous step) > Schema > Click Generate From Sample > Paste the Output which is copied in above step > Done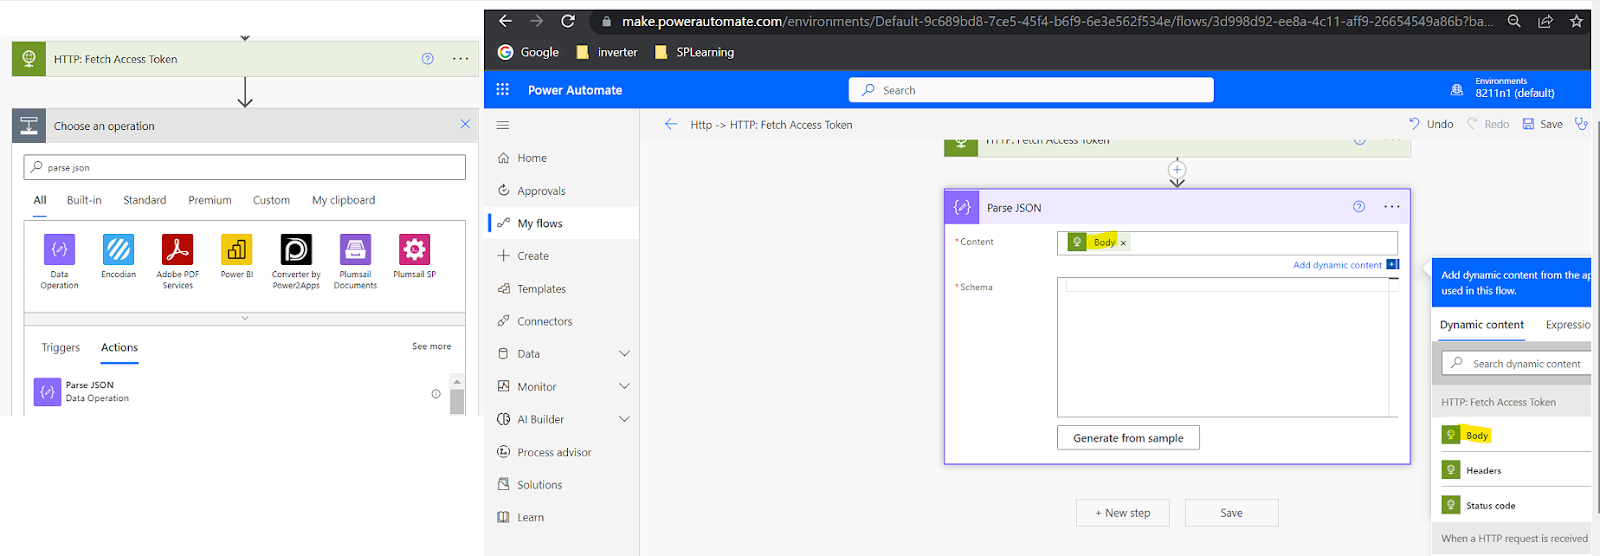

Http Request(To Create SP List Item): New step > Http > Method: Post URL: Rest API URL of which we mentioned in App Permission Request xml https://8211n1.sharepoint.com/_api/web/lists/getbytitle('TestList')/items
Headers: authorization : Bearer access_token (Note: Bearer we can see in above copied json) accept : application/json;odata=verbose content-type: application/json;odata=verbose X-HTTP-Method: POST Body: { "__metadata": { "type": "SP.Data.<Listname>ListItem" }, "Title":<Get from SPFx webpart on HTTP Req> } 
Response(To SPFx webpart): New step > Response > Body: Status Code from previous step > Save Flow
Http Request(To Create SP List Item): New step > Http >
}
Response(To SPFx webpart): New step > Response > Body: Status Code from previous step > Save Flow


Trigger Flow from SPFx: Now go to SPFx webpart > Update Webpart property (Automate Post URL) > Click Create Button > Now it will trigger the Power automate & create new item in SharePoint list.
Error:
Suppose if you using Client Id & Client Secret first time they you will get below error.
"Token type is not allowed."
Suppose if you using Client Id & Client Secret first time they you will get below error.
Reason & Fix: For new SharePoint subscription Grant App Permission is disabled by default. Run set-spotenant -DisableCustomAppAuthentication $false
Refer this Link for more details
Refer this Link for more details

Code to call Power Automate:
constructor(props:IElevatedPermissionProps){
super(props);
this.callPowerAutomate=this.callPowerAutomate.bind(this);
this.state={status:""}
}
public callPowerAutomate():Promise<HttpClientResponse>{
this.setState({status:"InProgress"});
return new Promise<HttpClientResponse>(async(resolve,reject)=>{
const body:string=JSON.stringify({Title:"Run with elevated privileges by App Account"+new Date()});
let restAPiUrl:string=this.props.flowUrl;
this.props.context.httpClient.post(restAPiUrl,HttpClient.configurations.v1,{
headers:{Accept:"application/json;odata=nometadata",
"content-type":"application/json;odata=nometadata",
"odata-version":""},
body:body
}).then((response:HttpClientResponse)=>{
console.log(response);
response.json().then((responseJSON)=>{
this.setState({status:"Item Created SuccessFully"});
resolve(responseJSON.value);
});
});
})
}
<BaseButton text="CreateItem" onClick={this.callPowerAutomate}></BaseButton> <div id='divStatus'>{this.state.status}</div>
<BaseButton text="CreateItem" onClick={this.callPowerAutomate}></BaseButton>
<div id='divStatus'>{this.state.status}</div>
Refer this Video for more details


Comments
Post a Comment