SPFx with PnPJS CRUD Operations (V3)
Create new SPFx React webpart
Follow this post to create new SPFx solution & open it in VS Code.
Note: All file creation & Basic details of each files are available in this post.
Final Output: Here we will be getting all the SP list names into dropdown list & doing CRUD operations in the selected list.

Install PnPJS:
Run this below command to install PnPJS. (Note: Here we use PnPJS Version 3, sp & graph objects have been deprecated. We will be using spfi npm install @pnp/logging @pnp/common @pnp/odata @pnp/sp --save
Create "pnpjsConfig.ts": In PnPJS Version 3sp and graph objects have been deprecated and will need to be replaced (link). So we are using this new config file. (RightClick on webpart folder>newFile>pnpjsConfig.ts)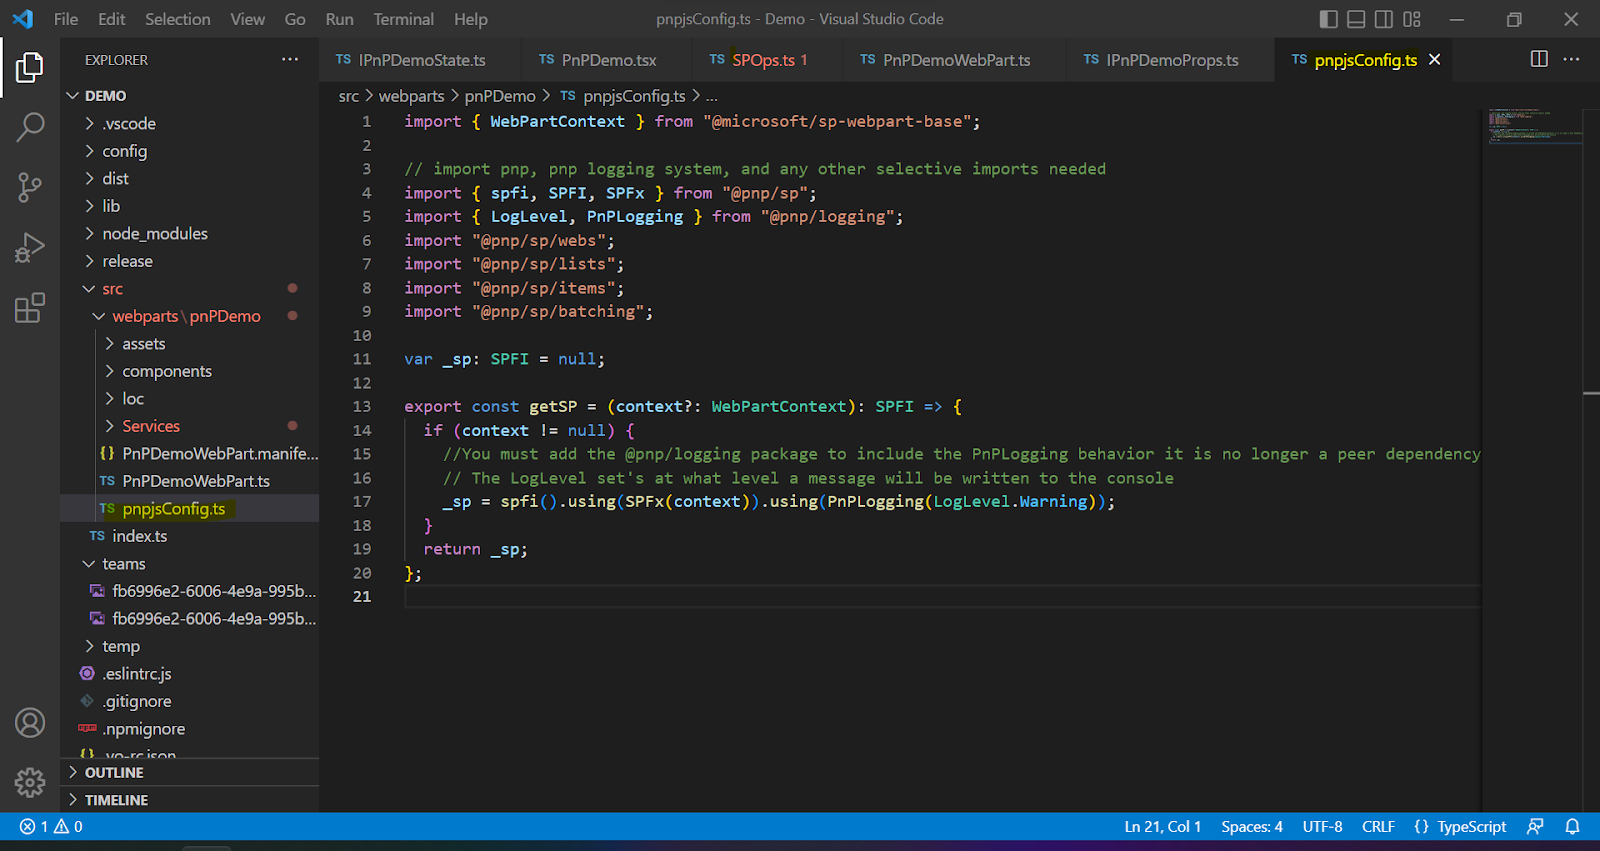 webpart.ts: Initialize above file getSP() context in webpart.ts file onInit() method.
Final Output:
Here we will be getting all the SP list names into dropdown list & doing CRUD operations in the selected list.
Install PnPJS:
Create "pnpjsConfig.ts":
In PnPJS Version 3
sp and graph objects have been deprecated and will need to be replaced (link). So we are using this new config file. (RightClick on webpart folder>newFile>pnpjsConfig.ts)webpart.ts: Initialize above file getSP() context in webpart.ts file onInit() method.
Setup basic code structure:
(i)Create State

Import state file in react component(.tsx file) & also add constructor to update state.

(iii)Create Service Files(For CRUD Functions):
- Right click on 'webparts' folder > create new folder 'Services' > right click on Services folder > create SPOps.ts fileImport this service file in component (.tsx) file


(iii)Component file(.tsx):
In component(.tsx) file import office-ui-fabric-react & add required controls (dropdown & button)

Setup SP Workbench(To test webpart):
To test in SP Workbench, update SharePoint site URL in "Config\Serve.json" file & run "gulp serve" command. (note: local workbench not available after SPFx 1.13version)


Deploy sppkg to App cataglog:
To get sppkg file run below command
gulp build --ship
gulp bundle --ship
gulp package-solution --ship
After this commands solution will create sharepoint folder & sppkg file. Next we can upload this sppkg file to app catalog site library & Enable it. Now we can edit the page & add his webpart.
Step 1: Read Operation: (Show all SharePoint list names to dropdown):
Output Screen: Get all Share Point list name into dropdown. (Code added below)

1.State.ts: Create state obj "listTitles" to get List values ("src\webpart\component\State.ts")
listTitles:IDropdownOption[]

2.Component File: Initialize "listTitles" ("src\webpart\component\.tsx")
(a) Initialize this under constructor > this.state={listTitles:[]}
(b) Add dropdown control & assign this value to ddl option options={this.state.listTitles}
(c) Add componentDidMount() method after the constructer. From here we will call the Service method which will return SP Data. This method is called after React render method called. Refer this for React Life cycle.  & we can add styles in scss file
3. Service.ts : Add Method getAllListTitles to get data from SharePoint. Initialize spfi & constructor(to use PnPJS). Add import {SPFI, spfi} from "@pnp/sp/presets/all"
Note: Code available at the end of this post
Step 2: Create Operation: (Create new item to SharePoint list using button click):
Output: Select List name in dropdown to create new item

1.State.ts: Create state obj "status" to show newly created List item ID ("src\webpart\component\State.ts")

2.Component File: Initialize "status" ("src\webpart\component\.tsx")
(a) Initialize status under constructor > this.state={status:""}
(b) Add button control & bind click event to create new list item.
(c) Add div & display status (Shows newly created list item ID)
<BaseButton
className={styles.myButton} text='Create List Item'
onClick={()=>this._spOps.CreateListItem(this.props.context,this.selectedListTitle)
.then((result:string)=> this.setState({status:result})) }>
</BaseButton>
<div>{this.state.status}</div>
3. Service.ts : Add Method getAllLists to get data from SharePoint.
Pass the webpart context & List Title as a parameter. Add this header

Note: Code available at the end of this post
Step 3: Delete Operation: (Delete list item by button click):
Output: Select List name from dropdown & Latest item will get deleted from this list.

1.State.ts: We will reuse state obj "status" to show deleted List item ID ("src\webpart\component\State.ts")
2.Component File: ("src\webpart\component\.tsx")
Add button control & bind click event to delete list item.
Div to Display status (Shows deleted list item ID)
To apply styles use "src\webpart\component\module.scss" && add CssClass to controls

<BaseButton
className={styles.myButton} text='Delete List Item'
onClick={()=>this._spOps.deleteListItem(this.props.context,this.selectedListTitle)
.then((result:string)=> this.setState({status:result})) }>
</BaseButton>
<div>{this.state.status}</div>
3. Service.ts : Add Method deleteListItem (Here we will get latest item from list and delete) Delete function && Get latest ID from list to delete function  Note: Code available at the end of this post
3. Service.ts : Add Method deleteListItem (Here we will get latest item from list and delete)
Delete function && Get latest ID from list to delete function
Note: Code available at the end of this post
Step 4: Update Operation: (Update list item by button click):
Output: Select List name from dropdown & Latest item will get deleted from this list.

1.Component File: ("src\webpart\component\.tsx") Add button control & bind click event to update list item Div to Display status (Shows deleted list item ID) To apply styles use "src\webpart\component\module.scss" && add CssClass to controls

<BaseButton className={styles.myButton} text='Update List Item' onClick={()=>this._spOps.updateListItem(this.props.context,this.selectedListTitle) .then((result:string)=> this.setState({status:result})) }> </BaseButton> <div>{this.state.status}</div> 2. Service.ts : Add Method updateListItem (Here we will pass ListItemID and update) Pass the List Title as a parameter 
Note: Code available at the end of this post
Code for CURD Operations:
Output: Select List name from dropdown & Latest item will get deleted from this list.
1.Component File: ("src\webpart\component\.tsx")
Add button control & bind click event to update list item
Div to Display status (Shows deleted list item ID)
To apply styles use "src\webpart\component\module.scss" && add CssClass to controls
<BaseButton
className={styles.myButton} text='Update List Item'
onClick={()=>this._spOps.updateListItem(this.props.context,this.selectedListTitle)
.then((result:string)=> this.setState({status:result})) }>
</BaseButton>
<div>{this.state.status}</div>
2. Service.ts : Add Method updateListItem (Here we will pass ListItemID and update)
Pass the List Title as a parameter
Note: Code available at the end of this post
PnPConfig.js(It will provide sp context):
import { WebPartContext } from "@microsoft/sp-webpart-base";
// import pnp, pnp logging system, and any other selective imports needed
import { spfi, SPFI, SPFx } from "@pnp/sp";
import { LogLevel, PnPLogging } from "@pnp/logging";
import "@pnp/sp/webs";
import "@pnp/sp/lists";
import "@pnp/sp/items";
import "@pnp/sp/batching";
var _sp: SPFI = null;
export const getSP = (context?: WebPartContext): SPFI => {
if (context != null) {
//You must add the @pnp/logging package to include the PnPLogging behavior it is no longer a peer dependency
// The LogLevel set's at what level a message will be written to the console
_sp = spfi().using(SPFx(context)).using(PnPLogging(LogLevel.Warning));
}
return _sp;
};
READ (Get all sharepoint list names to dropdown):
private _sp:SPFI = null;
constructor(){
this._sp=getSP();
}
public getListTitles():Promise<IDropdownOption[]> {
let listTitles:IDropdownOption[] = [];
return new Promise<IDropdownOption[]>(async(resolve,reject)=>{
this._sp.web.lists.select("Title")().then((results:any)=>{
results.map((result)=>{
listTitles.push({key:result.Title,text:result.Title})
})
resolve(listTitles);
},(error:any)=>{reject("error occured")})
})
}
CREATE:
public createListItem(listTitle:string):Promise<string>{
return new Promise<string>(async(resolve,reject)=>{
this._sp.web.lists.getByTitle(listTitle).items.add({Title:"PnPJS Item"}).then((results:any)=>{
resolve("Item Added Successfully! ItemID:"+results.data.ID);
});
});
}
Delete:
public deleteListItem(listTitle:string):Promise<string>{
return new Promise<string>(async(resolve,reject)=>{
this.getLatestItemID(listTitle).then((itemID:number)=>{
this._sp.web.lists.getByTitle(listTitle).items.getById(itemID).delete().then(()=>{
resolve("Item Deleted && ItemID:"+itemID);
});
});
});
}
Get Latest Item to Delete:
public getLatestItemID(listTitle:string):Promise<number>{
return new Promise<number>(async(resolve,reject)=>{
this._sp.web.lists.getByTitle(listTitle).items.select("ID").orderBy("ID",false).top(1)()
.then((result:any)=>{
resolve(result[0].ID);
});
});
}
Update:
public updateListItem(listTitle:string):Promise<string>{
return new Promise<string>(async(resolve,reject)=>{
this.getLatestItemID(listTitle).then((itemID:number)=>{
this._sp.web.lists.getByTitle(listTitle).items.getById(itemID)
.update({Title:"Updated PnPJS Item"}).then(()=>{
resolve("Item Updated && ItemID:"+itemID);
});
});
});
}


Comments
Post a Comment